Apartment DIY How-to: Building a Headboard
- Jun 17, 2014
- 3 min read
Updated: Aug 6, 2023
I get about six weeks off work every year (unpaid), so projects around the home/apartment are a great way to keep from going a little stir crazy. This time, one of the projects was to build a king size headboard from scratch.
There are more headboard styles than I ever realized and, upon settling on the elegant, yet fairly simple “Cleveland” version, it didn’t take long to realize that making angular wood cuts isn’t very conducive to the limitations a small apartment, a lack of tools, and lack of a true workspace brings. Thus, we decided to keep it simple – very simple – and left the plywood mounting board rectangular, which is the way we had Lowes cut it.
There are some shops in L.A. that specialize in foam, but the reviews on Yelp made them all seem more pricey than they should be. As an alternative, we bought two queen size mattress toppers, which can be easily cut up and pieced together as a backing on the mounting board. The other materials – the fabric, batting, and trim nails – all came from a fabric store. Also needed were a staple gun, wood screws, and spray adhesive. The “E6000” adhesive worked just well enough to get the job done.

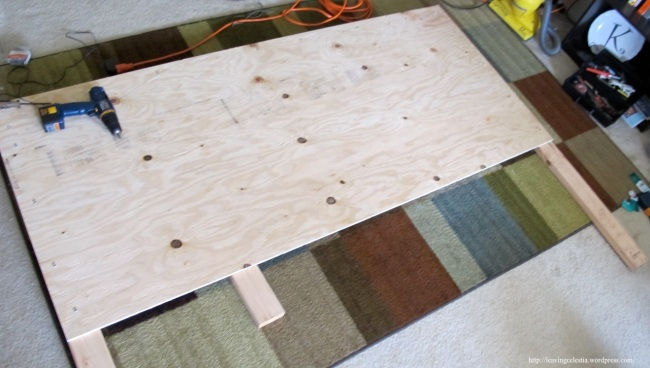
To start the labor, we mounted the 2×4 supports to the back of the plywood sheet. One support was attached to the left edge, one to the right edge, and one across the top to keep the plywood from bowing.
The next step was to attach the foam to the board. We found the best way was to roll up the foam and, as you slowly unroll it on the board, spray the adhesive on both the wood and the foam. As previously mentioned, the E6000 spray wasn’t so great, but the foam did stick after letting it sit for a while. Sorry I don't have photos to post of this part.
From there, the second layer of foam was cut to size, then held in place while the headboard was flipped over on top of the batting. The white batting was then pulled tight and stapled to the 2x4s (and plywood at the bottom).

We then stood the headboard up to make sure there were no major wrinkles evident in the batting and that the foam was looking pretty even.

Things were looking good, so the headboard was again laid face down in preparation for attaching the patterned fabric. We went ahead and stapled the top of the fabric to the top 2×4, following a point on the pattern across to make sure the fabric would appear straight on the visible side.
The headboard was again stood up in order to double-check that the fabric looked straight. It did, so we proceeded to pull the bottom of the fabric tight, which was then stapled on the back to the plywood. Once that looked good, we pulled the sides tight and stapled those, too.

What I was expecting to turn into a headache – mounting the headboard to the bed frame – turned out to be unnecessary. The headboard is solid enough to stand flat against the wall, held in place by the weight of the bed.

"Apartment DIY How-to: Building a Headboard"
Written by: Justin Kilmer
All images and media on this site are © by Justin Kilmer, unless otherwise noted.
If this page has helped save you time or money, consider helping us grow this site by donating a few bucks via PayPal below.
If you would rather make a purchase, check out this portfolio at Fine Art America.


Comments